Nagios ជា Tool ល្អសម្រាប់អ្នកគ្រប់គ្រង (Sysadmin) មិនគួរមើលរំលង

Nagios ជា Alert System ដែលត្រូវបានគេប្រើប្រាស់ជាច្រើនៅក្នុងក្រុមហ៊ុនដើម្បីគ្រប់គ្រងទៅលើ Inventory ផ្សេងៗដូចជា Server និង Service ផ្សេងៗទៀតដើម្បីប្រាកដថាមាន Server ណាមួយ Down មិនដើរ ឬ មិនដំណើរការ Service ណាមួយ។
Nagios វាខុសគ្នាពី Syslog ព្រោះ Syslog បានត្រឹមតែត្រួតពិនិត្យមើល តើមាននណាខ្លះ Login ចូល server ចំណែក Nagios វិញអាច Monitor មើលតើមាន Service ណាខ្លះដែលមិនដំណើរការ ឬ Server ណាមួយ Down ជាដើម។ វាមានលក្ខណះជា Realtime Alert ដោយឃើញភ្លាមៗតែម្តង។
ខាងក្រោមនេះជាការ តម្លើង Nagios នៅក្នុង CentOS 7

បន្ទាប់មកបង្កើត User nagios និង Group Nagios
useradd nagios
groupadd nagcmd
usermod -aG nagcmd nagios
បន្ទាប់មក download nagios តាមរយះតំណរខាងក្រោមនេះ
curl -L -O https://assets.nagios.com/downloads/nagioscore/releases/nagios-4.1.1.tar.gz
បន្ទាប់ពីដោនឡូតរួចហើយពន្លាវាចេញដោយប្រើប្រាស់ command
tar xzvf nagios-*.tar
បន្ទាប់មកចូលទៅកាន់ directory nagios រួចហើយមុនពេលតម្លើងវាត្រូវរៀបចំវាជាមុនសិន
./configure –with-command-group=nagcmd
បន្ទាប់មកចាប់ផ្តើមតម្លើង Nagios Core
make all
make install
make install-commandmode
make install-init
make install-config
make install-webconf
ដើម្បីអោយ Apache អាចដំណើរការជាមួយ Nagios បានត្រូវ Add Group Nagios អោយទៅ User apache
usermod -G nagcmd apache
ជំហ៊ានបន្ទាប់មកទៀតត្រូវដោនឡូត Nagios Plugin បន្ថែមទៀតដើម្បីតម្លើង
curl -L -O http://nagios-plugins.org/download/nagios-plugins-2.1.1.tar.gz
tar xzvf nagios-plugin-*.tar.gz
cd nagios-plugins-*
./configure –with-nagios-user=nagios –with-nagios-group=nagios –with-openssl
make
make install
ជំហ៊ានបន្ទាប់ទៀតត្រូវតម្លើង Nagios remote plugin Executor របៀបតម្លើងស្រដៀងៗគ្នាទៅនិងជំហ៊ានខាងលើ
curl -L -O http://downloads.sourceforge.net/project/nagios/nrpe-2.x/nrpe-2.15/nrpe-2.15.tar.gz
tar xvf nrpe-*.tar.gz
cd nrpe-*
./configure –enable-command-args –with-nagios-user=nagios –with-nagios-group=nagios –with-ssl=/usr/bin/openssl –with-ssl-lib=/usr/lib/x86_64-linux-gnu
make all
make install
make install-xinetd
make install-daemon-config
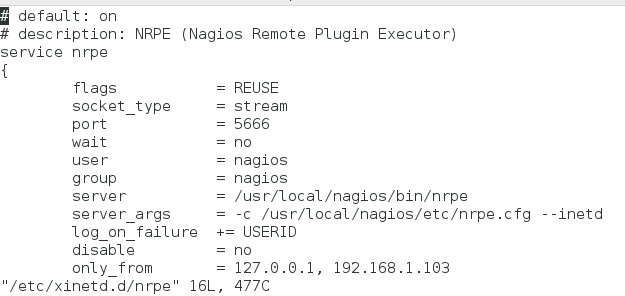
បន្ទាប់មកទៀតត្រូវចូលទៅ Configure xinetd ដើម្បីអោយ Nagios ដំណើរការនៅលើ Private IP ឬ public IP
vi /etc/xinetd.d/nrpe
រួចហើយ Restart Service xinetd
systemctl restart xinetd
ជំហ៊ានបន្ទាប់ Configure Nagios Service ដើម្បីអោយវាដំណើរការបាន
vi /usr/local/nagios/etc/nagios.cfg
cfg_dir=/usr/local/nagios/etc/servers
បន្ទាប់មកទៀតត្រូវបង្កើត Nagios directory ដើម្បីអោយវាផ្ទុកនូវ Configuration របស់ Server និមួយៗដែលយើងត្រូវ Monitor វា
mkdir /usr/local/nagios/etc/servers
បន្ទាប់មកទៀត configure Contact for Nagios ដើម្បីអោយវា Email នៅពេលមានបញ្ហាអ្វីមួយ ដោយចូលទៅកែ File ដូចខាងក្រោមនេះ
vi /usr/local/nagios/etc/objects/contacts.cfg
email admin@brembrey.com
ជំហ៊ានបន្ទាប់មកទៀតត្រូវ Add Command សម្រាប់ monitor ទៅលើ Server
vi /usr/local/nagios/etc/object/command.cfg
define command{
command_name check_nrpe
command_line $USER1$/check_nrpe -H $HOSTADDRESS$ -c $ARG1$
}
បន្ទាប់មកទៀត configure Apache Server ដើម្បីអាចអោយ Sysadmin ចូលទៅប្រើប្រាស់តាមរយះ web browser
htpasswd -c /usr/local/nagios/etc/htpasswd.users nagiosadmin
បន្ទាប់មកទៀត restart service httpd
systemctl restart nagios
systemctl restart httpd
systemctl enable nagios on
systemctl enable httpd on
ចុងក្រោយអ្នកនិងបាន Nagios មួយដែលអាច Monitor Server បាន

ប្រសិនបើត្រូវការ Function បន្ថែមត្រូវដោនឡូត Plugin មក install បន្ថែមដើម្បីអាចប្រើប្រាស់បានច្រើនជាងនេះ នៅតំណរខាងក្រោមនេះ Nagios Plugin
ប្រសិនបើលោកអ្នកចង់អោយកាន់តែងាយស្រួលតម្លើងជាងនេះទៅទៀតអាចដោនឡូត Nagios ស្រាប់ដែលមានភ្ជាប់មកជាមួយ OS រួចជាស្រេចនៅក្នុងតំណរនេះ Fully Automation Nagios