SLC season 26 week 5||Texture pottery||
 |
|---|
Greetings and blessings to all my artist friends |
|---|
Welcome to Steemit Challenge Season 26 to all my lovely friends. I am very happy to have this opportunity it's brilliant chance for those who are really willing to learn pottery making and painting with me. The course outline consists of 6 parts weekly in which I love to share the basic tips and techniques practically with demonstration of basic things needed for work on different materials like cement,white cement,plaster of paris , musiac pot making, different types of beautiful pot making etc.
Friends, today I am very happy to present the fifth week of this proposal. For the this week, as I mentioned in my application post, starting from the beginner level makes it easy to understand further step-by-step moves at the advanced level gradually so moved on second level... That,s "Texture pottery with painting".
Texture pottery is a good techniques can produce a range of effects, from subtle nuances to dramatic, three-dimensional designs. Textured pottery can add visual interest, depth, and tactility to functional or decorative pieces.few textured style are .....
- Stamping or stenciling
- Carving or incising
- Impressing pattern
- Natural materials pattern
Let me share here the 3 basic textures pottery idea belongs to stamping and carving techniques,it's quite interesting and easy to make do guy let get started...
 |
|---|
I am using utensils/equipments that already at your home it's saved your time and money...Happy learning...❣️
| Materials |
|---|
| Water as needed |
| 3 clay pot/any pot |
| White glue |
| White cement/wall putty powder |
| Acrylic paints and brushes |
Complete procedure on my YouTube channel
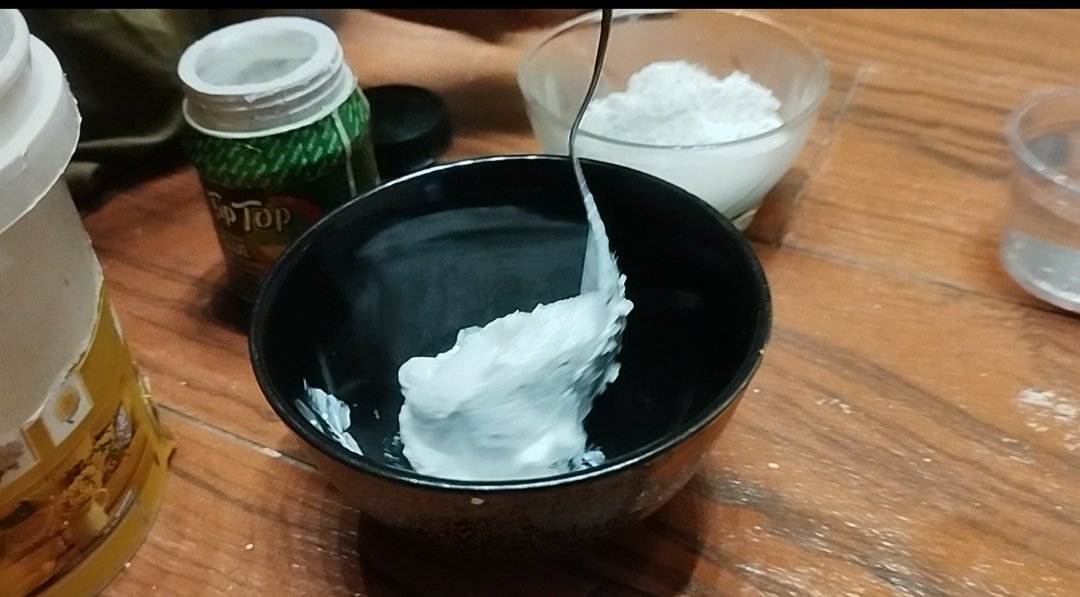
Take a clean bowl add wall putty powder /paste ,white glue mixed it well then add few drops of water and kneated the dough make sure wrapped the dough in wet cloth or wet tissue otherwise it would dry and spoiled /waist dried like stone you never used it as a clay for designs.
 |  |
|---|
I decide to make a sunflower 🌻on my clay pot for that I made a small balls shaped from clay then pasted one by one on pot on this stage no need to glued it ,infact clay already had white glue in the dough so made 5 petals with center part first.but first I made little bigger ball for the central part of the flower then made small balls that's 5 ,used your hands,s palam for that and tried to make patel like the same pattern/style for your floral design.I made 3 whole flowers according to my pot size it's your own choice you make as many as your design.let it dry for at least two hours .

The complete look of flower before painting
 |  |
|---|
- Now reached on final step which were painting on my beautiful embossed floral design for the I painted brown colour in center and yellow for pastels just like sunflower 🌻 had ,shaded from orange 🧡 colour and let it dry till paints completely dry .
 |  |
|---|
Final presentation
It's fine result of my clay texture pottery I arranged some flowers on it and also painted stand in brown colour and put the pot over the stand I am sure it's very simple way to give your simple pot into beautiful one and it will definitely nice addition to your home decor.
 |
|---|
The second is also very interesting I used stamping textures techniques for the same by using my pan,s caps you all are more talented and more smarter then me so guys I would like to see your original style participation in week :5.
 |
|---|
In start I teach you how you can make correct putty paste for the creative design on our pot so far well friends for wall putty paste similar like muasic paste but we need more thickness because we carving or stamping and in results we need more visible and detailed impressions on pot so applied thick textured paste .we need a clean bowl add wall putty powder or putty paste that easily available in market add white glue and water and make a thick paste.
 |
|---|
- I add two table spoons of wall putty this time I used in paste form if don't have nevermind you can add white cement in few amount instead of the putty paste/powder form ,the main purpose of applied putty paste getting more visible and detailed textures on our pottery.
|
|---|
- Mixed well from spatula ,make sure your putty paste must be finely mixed no lumps appear in it when you applied on pot not drop down and you will not faced challenges during the work.
 |
|---|
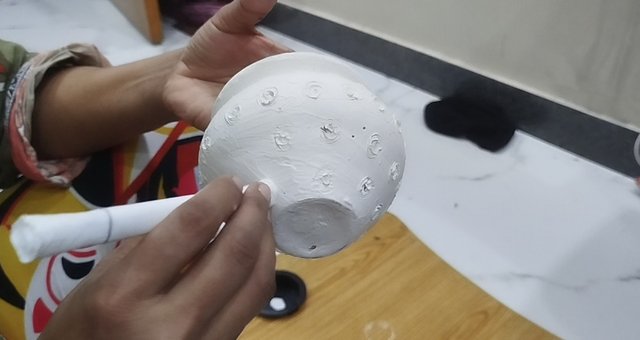
- Now take a pot and applied wall putty paste on all pot evenly using your wet hand for final smooth base ,then I carving from my old pen,s cap as pressed by force and stamping randomly on all over the pot .leave it for dry at least two hours .
- Painting/final touch ups
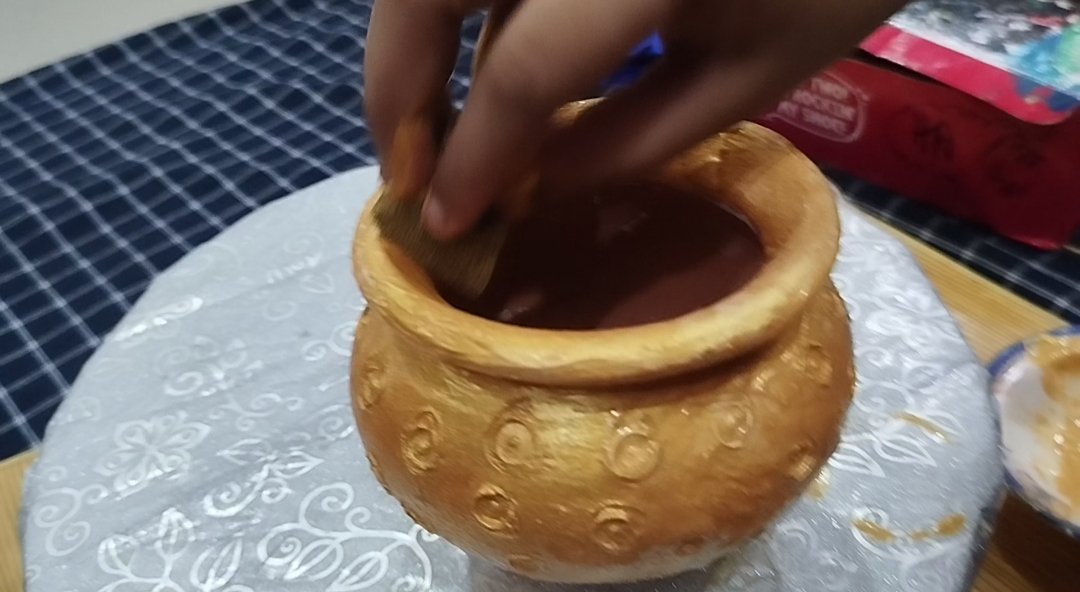
Now I decide to give vantage look for my pot so painted it golden colour on while pot .
 |
|---|
using sponge for fixing colour on pot
 |
|---|
we just applied golden metallic acrylic paint colour by using small pice of sponge and cover all over the pot and let it dry .our beautiful textured pot is ready for stamping you can used clay stamps and as you like.
So guys it's a stamping texture pot I hope you all make for your,s soon .


I made this pot pot by followed the same method that I above explained this time I give some impressions in hearts 💖 shaped by using sharp tip stick as you see in images.make sure when you create your design your wall putty paste must be wet so try to.dine your work fast other wise it would dry and you never work or create details as you wants .spray water during work it's I cread the mine of drying so used it during making process more enjoyable and peaceful.
 |  |
|---|
- Now it's time to paint it from your choice I love to give multicoloured hearts all over the pot and let it dry ,the acrylic paint needs for minutes for complete dry so let dry .

My third pots is ready I give it simple look I hope you will make your own soon
1 . This week no need for making pot ,take a pot from any materials as your convenience given texture one of the above style by using wall putty method" follow given method in the course or as you like ,add detail with step-by-step pictures. Include your name tag with the date at the final presentation of your work.
(6 Marks )
2 . Share with us what was the difficult step during practical task??? (2 -marks)
3 . Share with us the price of the plaster of Paris and materials in your local currency and in Steem ???
. (1 Mark )
4 . One mark for presenting excellent creativity.
The Title of your submission should be "SLC-S26/W5 || "Texture pottery"||
The post can be written only in #creativepluse community and please subscribe .
You are free to share your practical base work but not skip the step by step procedure and photograph, your article should have sufficient explanations and excellent presentation.
You have to include some mandatory tags in your post, such as #potterychallenge-s26w5, #steemexclusive, #art, , and your country tag.
Invite 3 friends to participate. I would like to invite @sadaf02, @jyoti-thelight, and @lirvic to participate in the challenge.Leave the link to your post in the comments of this post.
This contest will be open for 7 days starting from Monday 08-09-26 ,00:00 UTC and closed on 14-09-25 0n Sunday.
Each week we would like to select the six people who have given their best. The selection of the people who have given the best tasks should be based solely on the quality of their post. All weekly winners, as will receive additional votes for the @steemcurator01 prize
At the end I am sure you all have learned with me some new creative tips and techniques and developed your skills by engaging in various activities every week, insha'Allah. I am sure you will enjoy all weeks. A lot of good entries will be expected from my whole Steemit family.
Coloured pottery
Thanks
@sualeha
Drawing more than wonderful natural colors you have skills do not neglect
0.00 SBD,
40.11 STEEM,
40.11 SP
Ek baar phir se intresting topic.
0.00 SBD,
0.24 STEEM,
0.24 SP
🎉 Congratulations!
Your post has been manually upvoted by the SteemX Team! 🚀
SteemX is a modern, user-friendly and powerful platform built for the Steem ecosystem.
🔗 Visit us: www.steemx.org
✅ Support our work — Vote for our witness: bountyking5
Late one evening, I came across the plinko game while searching for something light and fun. The interface was clean and intuitive—just drop a disc and watch the pegs do their work. After a few losses, I almost clicked away, but the suspense got to me. Then I landed a couple of great drops that covered everything and then some. That rush of not knowing where the disc will land hooked me, and I ended up playing way longer than I intended.