Let's do it...Do It Yourself👉Craft, Creativity, Drawing, origami, DIY, Recycling and more week72

Materials For Construction
- Waste plastic bottles
- Waste carton
- Paper cutter
- Acrylic colour
- Adhesive
- Masking tape
- Brush
- Crayola
- Pencil

Step 1
I clean the plastic rubbers and remove the label from them. I also drew the cabin (windows) and the cockpit (flight deck) using a crayola colour.

Step 2
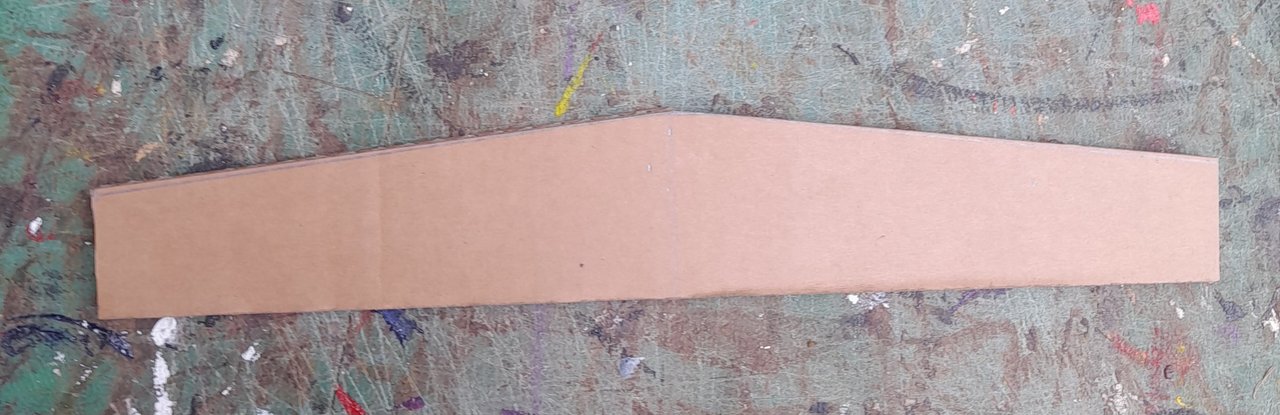
I constructed the wing of the aeroplane using waste paper. I measure the length to be 30cm, the width at both ends to be 3.5cm and the width at the centre to be 5cm. I drew this measurement on the waste carton and then cut it out using a paper cutter.
Step 3
I gummed the three rubbers on the wing. The two small rubber serve as the turbine engine while the Coca-Cola bottle is the fuselage (body of the aeroplane). I also seal the edge of the wing with masking tape.

Step 4
I constructed the elevator and the vertical stabiliser. The elevator measures 16cm in length while the stabiliser measures 10cm. I drew it on the waste carton and cut it out using paper cutter. I seal the edges of the elevator and stabiliser using masking tape, and lastly, I gummed them on the aircraft.

Step 5
I constructed the tyres of the aeroplane using bottle tops and cartons. I cut the carton to be 4.5cm long and the width to be 1cm. Lastly, I gummed two bottle tops together and the carton at both ends.

Step 6
I mount the tires on the aeroplane using strong adhesive. One tyre in the front and two at the back.

Step 7
I constructed a four-blade propeller and mounted it on a turbine engine and one on the nose of the aeroplane.

Step 8
I coloured the aeroplane using a light blue acrylic colour. I got the colour by mixing deep blue with white acrylic colour.

Step 9
I coloured the cockpit and the cabin using a black acrylic colour. I also coloured the tires and the four-blade propeller with black acrylic colour, and lastly, I coloured the edge of the cockpit with white acrylic colour and a touch of deep blue colour on the wing and the stabiliser of the aeroplane.

My Selfie

Conclusion
These are the steps I have taken to construct my aeroplane from a waste carton and plastic bottles. Thank you all for visiting my block and for your support. I invite @m-princess, @sualeha, @tammanna and @afrinn to join me in the contest.
CC
@mesola
10% beneficiary to @steemkidss
@tipu curate
;) Holisss...
--
This is a manual curation from the @tipU Curation Project.
Upvoted 👌 (Mana: 5/8) Get profit votes with @tipU :)
X Share (Twitter) Link
https://x.com/Manasseh3600/status/1943119209799516305?t=niwHeUGSwJ3AvfuKa9MM-w&s=19
Thank you for the support.
What an impressive creation, this is astonishing and the final result is amazing. Great work friend and success to you.
Thank you
Your creativity just amazing. I like so much your discover.Best of luck.
Thank you for publishing an article in the Steem Kids & Parent community today. We have assessed your entry and we present the result of our assessment below.
MODs Comment/Recommendation:
Your craft is incredible and steps easy to follow. Can't wait to see your next magic
Remember to always share your post on Twitter. This POST LINK is a guide to that effect.
Thank you sir