My first Resin Art Craft
Hi friends,
I am Jyoti from India.
Resin art is a craft method that uses epoxy resin chemical and hardener, along with glitter, stuffed flowers, plants, leaves, pearls, and beads, to create a glass-like appearance . It requires a lot of materials to make it, but the results are very beautiful.
In this craft method, home decorations, furniture, gift items, personalized gifts, etc. are made. I tried to do it as a business from home here. For that, I made it to give a gift to my daughter's birthday next month. I am going to explain to you in detail how I did it. I hope you like it.
Required Materials
💚 epoxy resin 💚 hardner 💚 Glitter 💚 stuffed dlowers 💚 metallic pigment colors 💚 liquid color solution 💚 stuffed leaves 💚 printed photo ,date, messages 💚 weighing scale 💚 mixing tools 💚 hot blower 💚 gloves 💚 stand
Step1 :
First, I measured the epoxy resin and the ordinator in a bowl using a measuring scale and took it in a ratio of 2:1, then mixed it well for 5 minutes.
Step 2 :
The mixed resin should be left for 15 minutes. If necessary, you can add color to it. So to add color, I divided it into two use-and-throw glasses, mixed the liquid solution color in one, and mixed the pigment powder in the other.
Step 3 :
There are many molds for converting liquid resin into solid, which are available ready-made in stores and online. I placed LED light strips in a mold I bought. These LED lights are also available in the market and online.
Step 4 :
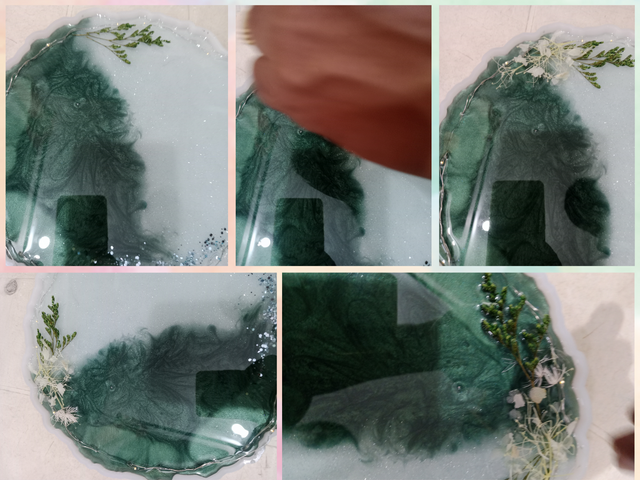
After putting it on, switching it on, and testing it, I took the two resins that I had mixed and started pouring them. First, I poured the dark color into the mold, partially. Then I took the light-colored resin and filled the rest of the area.
Step 5 :
Then I added other elements to the resin, such as stuffed flowers, stuffed leaves, and beads .
Step 6 :
Then I blew air on it with a hot blower to break the bubbles in it. Then I added glitters, simmers and moved it as needed. placed them all on this and then gave it a day to dry.
.png)
Step 6 :
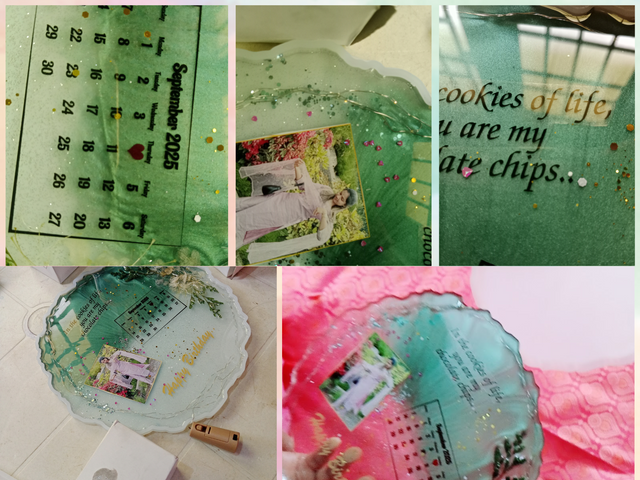
Also, to make this craft, I had my daughter's photo and her birthday highlighted along with a calendar and printed it out. Similarly, I had cut out letters saying "Happy Birthday" to wish her and put them all on this.
.png)
Step 7 :
After drying for 24 hours, I took those elements to make this craft. I had my daughter's photo and her birthday highlighted with a calendar and pinned it. I also bought cut-out letters saying "Happy Birthday" to wish her well.
Step 8 :
I put them all on it, mixed it again with Resin Tourist One in the same ratio, left it for 15 minutes without mixing anything in it, then took it out and poured it over the photo and other elements of the calendar and covered it.
Step 9 :
Then I added some glitters where needed and left it to dry for a day. The next day, after it dried well, I took it out of the mold. It was solid and glass-like, and it was very beautiful to look at.
This is very easy but requires a lot of ingredients and time. Patience is essential for this. I did it patiently and it turned out really well. I am going to send this to my daughter as a gift for her birthday next month. I think she will be happy to see it. I hope you like this forest. Your comments are definitely appreciated.
Discord : @jyoti-thelight#6650 Telegram :- https://telegram.org/dl

.jpg)

.png)
.png)
.png)
.png)
.png)
.png)
.png)

