Digital weighing scale keyboard repair. || Problem: Keyboard connection is loose. The keyboard works upside down. || With a video tutorial.
Assalamu alaikum Everyone. I am @imranhassan From #Bangladesh
.png)
A few days ago, a grocery store owner in my area gave me a digital weight scale machine and said that the buttons on its keyboard were working in reverse and were not showing the rating properly and the meter of the load shell was working properly but was not able to match the amount of money with the weight. Then he gave me the digital weight scale and said to repair it very quickly. Then I brought it home and repaired it, and it was completely repaired, so let's see how I repaired it step by step.
Step -01

So first you can see that I took the top cover of the digital weight scale to my work table and observed what was wrong with its keyboard, so let's turn it over and see what happened here.
Step -02

I am showing you here by zooming in with the software how the soldering connections from the keyboard have come loose, and that is why not even one connection of this keyboard was working. And here is an interesting thing: if even one of the two connections is loose, then your keyboard will work in reverse.
Step -03

Now for you to understand better, I have taken this picture; see how the lines from the keyboard have come loose and the wires have become separated and how to connect it, from which site to connect them, but it is shown very beautifully in the video; if you want, you can watch the video.
Step -04

Since there are 10 connections in the input line of the keyboard, that is why I have taken 10 pieces of jumper wire here to make the connection because the previous wires were a little soft. That is why I will not solder those wires here; first I will solder a good strong wire here.
Step -05

As you can see, I have connected 10 jumper wires with ten lines, and while making the connection, some lines on the circuit board were damaged, so I soldered the lines from where they reached, that is, at the base of the button.
Step -06

Then I cut the insulation off the wires of the previous jack and took out the inner copper and soldered them. Now I will solder these wires to my jumper wires.
Step -07
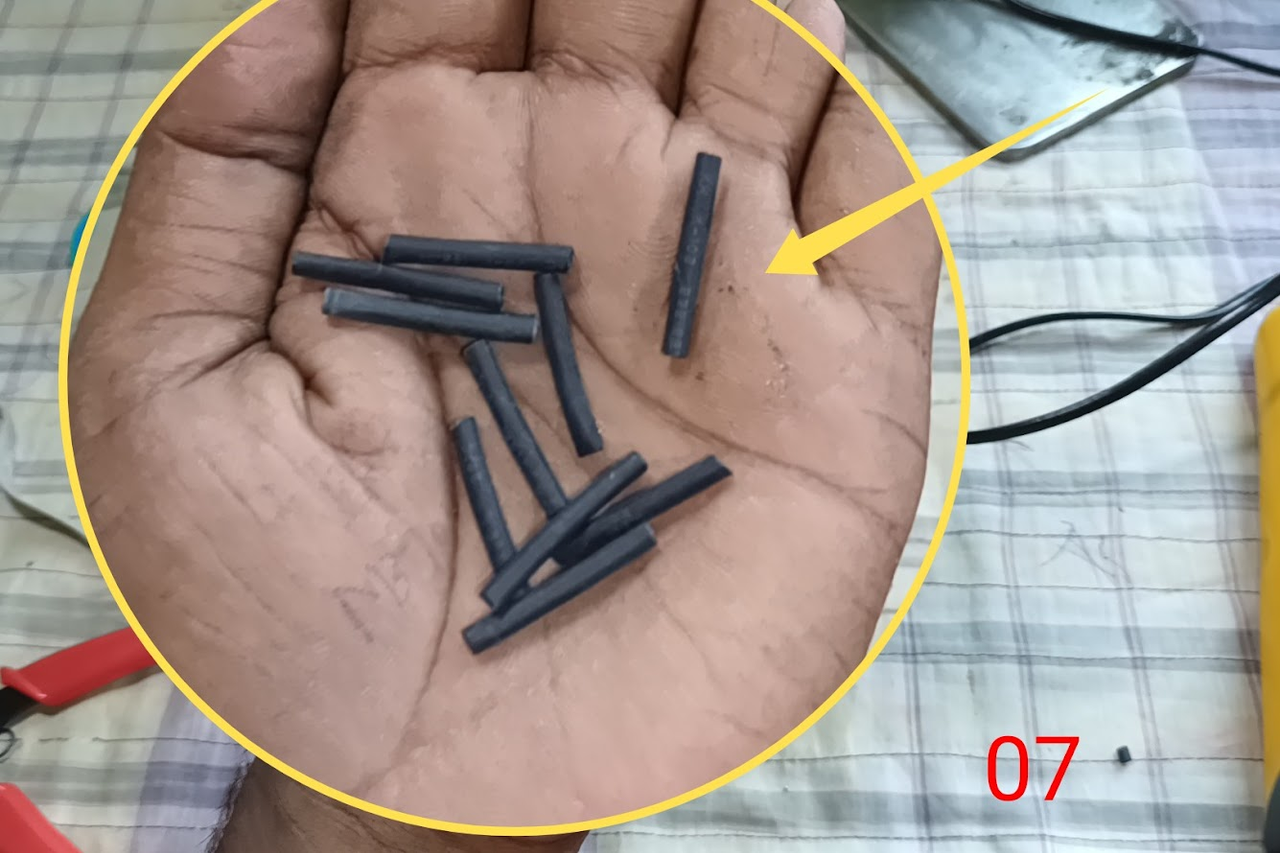
After soldering, I need to cover these connections nicely with a cover, so I used some heat sink tubes here so that my connection pairs can be insulated nicely.
Step -08

In this picture, you can see that I have already inserted the heat sink tubes inside the jumper and soldered the white wires of the previous digital weight scale to my jumper wires.
Step -09

Now, to check whether my lines are soldered properly and whether the connections are reaching the keyboard from the female connection of the jack, I took a digital multimeter and selected the continuity mode and checked the lines, and you can see that a red light is showing on my digital multimeter, which means that it is signalling that the lines are fine.
Step -10

Then I took a gas lighter to insulate the heatsink tubes nicely and to strengthen the connections so that they do not look bad and the connections become beautiful and they can be replaced well.
Step -11

After connecting all the lines, I connected the circuit, and I powered the digital weight scale, and you can see that I have given a rate of 50 taka, where the money will be measured through the button, and the button is working properly.
Step -12

Now in this picture you can see where I have given the input voltage and taken the output voltage and how I have folded the lines in the circuit because while soldering the circuit board, some lines were damaged because the lines of the circuit board were very old, due to which they were damaged during soldering, so I soldered the lines where they ended.
Step -13

Then I attached the top cover to the complete digital weighing scale machine. I checked its rates again. Now you can see that the rate is 60 taka, and now the weight of the product that will be given here will show its value in another place below.
Step -14

After the work was completed, I took a selfie with my work. I had to be patient and patient while doing this work because every time I connected the lines of this digital weight scale, the lines of my keyboard were working in reverse. I had to test the continuity of the buttons repeatedly and connect them in the right places to make it run. If you watch the video, you will understand clearly how the connections were made and how I did these things.
| Video Tutorial: To better understand the practical part of this tutorial, you can watch the video below. |
|---|

✅ CC: My friend @rmm31
✅ We support @pennsif and @pennsif.witness for the growth of this platform. pennsif.witness his contribution to the Steemit community. Vote for him as a Witness here: Click to Vote
| Photography Details | 📱 Device: Walton Xanon90 | 📍 Location: Narayanganj, Bangladesh | 📷 Captured By: @imranhassan |
|---|
hi, is this a fresh video? uploaded 7 days ago
Sir, I do repair work and since my phone's memory is full, I edit them and upload them to YouTube. Then when I get time between work, I post them.
Ahora llegó a tía manos una báscula digital, pudiste solventar la falla reemplazando los cables de comunicación de la tarjeta al Display. Hace meses llegó a mi mesa de trabajo una báscula de otro modelo, el cuál se puso loca, el problema estuvo en las soldaduras, la humedad hizo que perdiera la conductividad. Volví a soldar con estaño y así el problema se solventó.
This weight scale issue has been bothering me a lot.Because every time I made the connections, the lines would automatically come out of the circuit board because the circuit board was very old and damaged.Every time I connected the circuit, one line would repeatedly come loose, so I soldered directly to the base of the button, looking at the lines.I opened and fitted it four times and then it worked perfectly.
https://x.com/ImranHosen98536/status/1966553913592889412