Digital multimeter damaged battery repair Method
Assalamu Alaikum dear, Greetings to all from my motherland Bangladesh and a warm welcome to my blog for another session on the topic of my daily lifestyle content.
 Thumbnail photo
The contribution of electronics in our daily life is immense. In today's world, digital technology is used in every work, so electronics is very important there. Many of us are involved in electronics work. So today I have brought you a tutorial. I have a digital multimeter which is used for very important work.
| What is done with a digital multimeter? |
|---|
The use of electricity and electronics in our daily life is increasing day by day. In this technology-dependent era, while using electrical appliances, we often need to measure voltage, current or resistance. In this case, a digital multimeter works as an essential device.
A digital multimeter, abbreviated as DMM, is a device that can be used to perform various tasks such as voltage (Volt), current (Ampere), resistance (Ohm) in addition to transistor test, diode test or continuity check. Since it has so many functions in one device, it has become very important for electricians, engineers, technicians and even ordinary users.
The importance of digital multimeter in education is immense. It is an essential tool for electrical and electronics students. They use this device to gain knowledge by conducting various experiments in real life. The most important thing is that using digital multimeter saves time, reduces costs and increases the quality of work.
So digital multimeter is not just a measuring instrument, it is our reliable companion in the world of technology. Through it, we can solve various electrical problems safely, easily and quickly. My digital multimeter's battery has died due to not being used for a while. It wouldn't turn on at all.
| My digital multimeter |  |
|---|
| Specifications of this digital multimeter. |
|---|
| Name | Digital multimeter |
|---|---|
| Company | Made in China |
| Model | VC9205A |
| Voltage range | AC 750V/ DC 1000V |
| Current range | AC 10A/ DC 10A |
| Shutdown | Automatic |
| Battery | 9V |
| Weight | 366g |
| Problem identified | battery damage |
| How important is it to learn how to repair a digital multimeter when its battery is dead? |
|---|
A digital multimeter is an essential tool in electrical and electronic work today. Its use can be seen everywhere, be it at home or in the office, in education or in industry. But when the battery of this important device is dead, it becomes useless. In such a situation, if we can repair or replace the battery ourselves in a very simple way, it will be very beneficial for us.
First of all, learning how to repair or replace a battery means being self-reliant. If we can repair a multimeter by ourselves, we no longer have to rely on others for minor problems. This saves both time and money. It increases our technical knowledge and skills. Learning the internal structure of a device, understanding the battery connection system and circuits is not only useful in repairing a multimeter but also in repairing other devices in the future.
| How I repaired a new battery from a damaged one? |
|---|
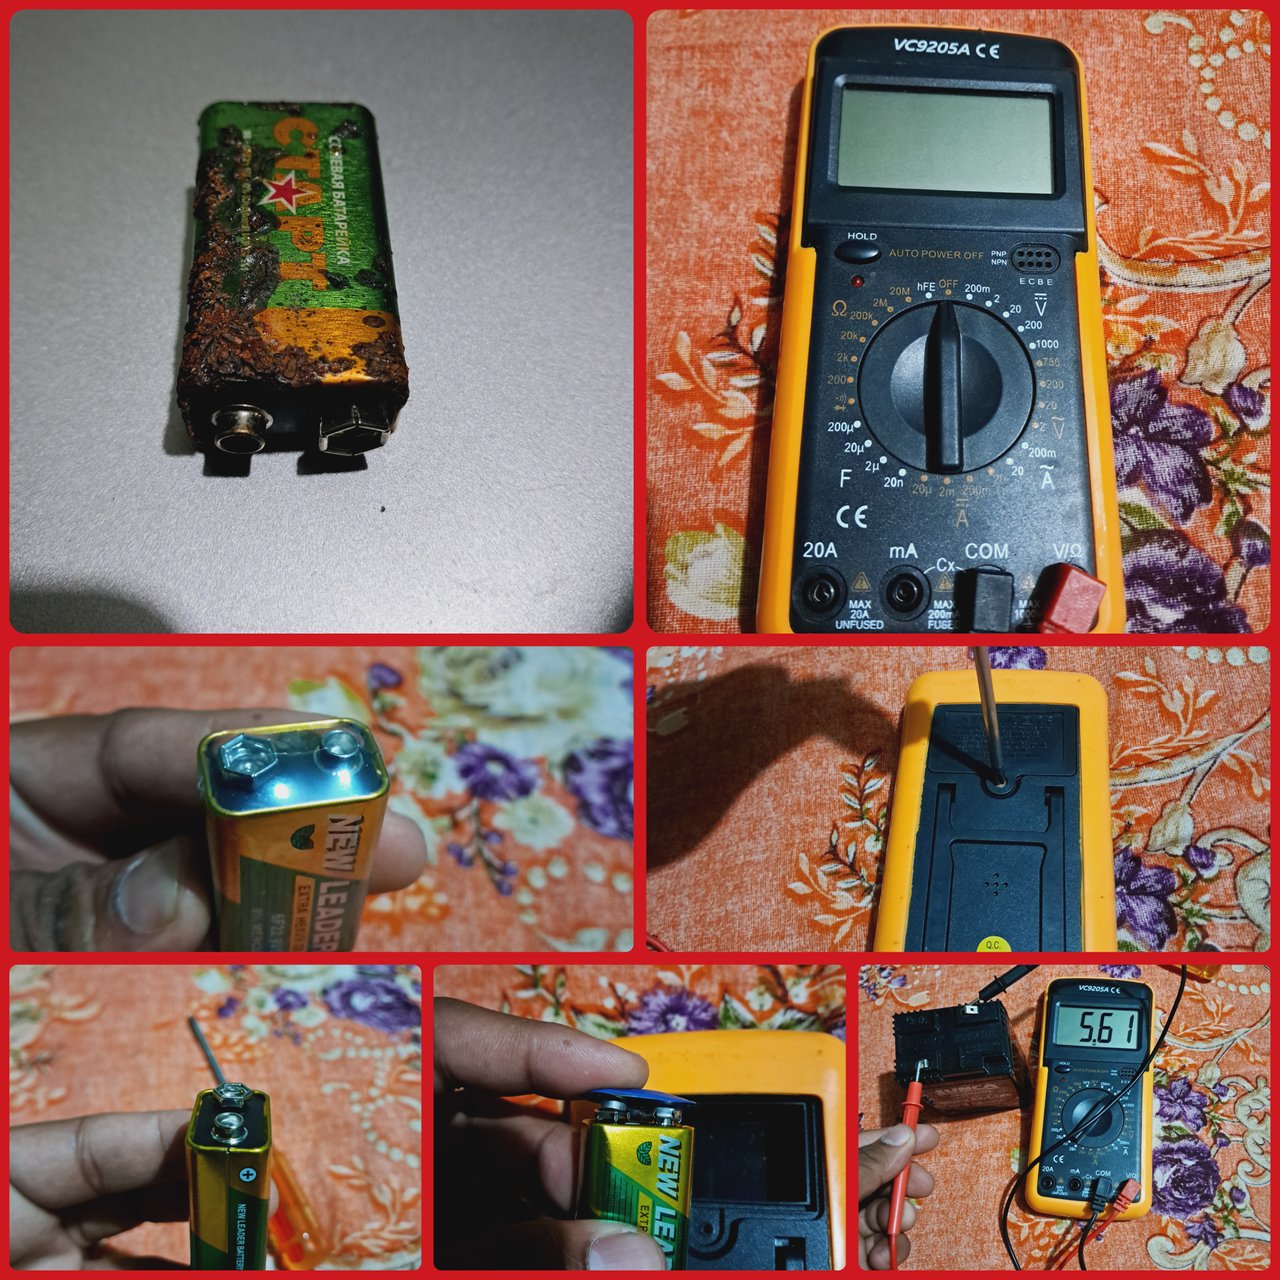
- This multimeter has not been used for a long time, so the battery is dead. Look at this damaged battery and see how it is damaged. It is probably rusted and the cells in the battery are damaged. Multimeter batteries are commonly called DC batteries because they supply direct current.
| Dead multimeter battery |  |
|---|
- Then I bought a new battery from Electronics which cost BDT 60 or 4 steem approx. It is basically a 9V battery, most digital multimeters use this type of battery. When I bought it, it had a plastic cover on it, which I unboxed.
 |  |
|---|
- This battery is connected right at the back of the multimeter. So I gathered my screwdriver and tried to open the screws on the back. You have to open the screws on the back very carefully, be careful not to break them. I removed the screws with the screwdriver in the correct order.
| Screws are being opened using a screwdriver |  |
|---|
- The screws must be opened very gently so as not to break them. Once the screws are opened, the top lid must be opened. The battery is inside the top lid, so the lid must be opened directly. The battery cannot be removed without opening the lid.
| The back cover is open |  |
|---|
- Once the lid was open, I took out the old battery from inside the lid. This battery was only held in place by two clips. There are two clips here. One negative side and one positive side. The two clips are connected together to the battery, I pulled it open in the right way.
| Negative and positive pins |  |
|---|
- Then I put the old battery in a specific place. Then I collected the new battery. I had opened the top cover of the battery so that its positive and negative sides were visible. There are two clips here, one slightly thicker and one thicker. So you have to put the clip here according to the clip of the multimeter.
 Negative and positive pins of the battery
- Now I need to connect the battery to the multimeter pins. I connected the thin pin of the multimeter to the thick pin of the battery. Then I connected the thin pin of the battery to the thick pin of the multimeter. It needs to be connected in the opposite way so that it is set in the correct shape. See the picture below, it is set correctly.
 |  |
|---|
- The battery has been set correctly. Now the battery needs to be inserted inside the multimeter. So I pressed the battery and set it in its previous position. You can see that the battery is set correctly in the upper part of the multimeter. Then I screwed the back cover properly with a screwdriver.
| Battery reinserted |  |
|---|
- Now I have to turn on the multimeter, so I said Bismillah and turned on the multimeter with the name of Allah. You can see that my multimeter showed points. That means it is set correctly and turned on. That means I was able to repair the battery correctly.
| Multimeter turned on |  |
|---|
- The multimeter is now ready and can be used to measure. So I collected a 6 volt battery and placed it next to the multimeter. I will now check its voltage. I placed the negative pin of the multimeter on the negative side of the battery and the positive pin of the multimeter on the positive side of the battery. You can see that the point here shows the current voltage of the battery. Here the total voltage of my battery is 5.61 volts. Since it was a 6 volt battery, it shows the voltage lower because the charge is a little lower.
 Battery voltage is being measured.
| Why does the battery of a digital multimeter die? |
|---|
Leaving the multimeter on: If you leave it on without turning it off, the battery will slowly drain even if you are not taking any measurements.
Using low-grade batteries: If you use substandard or expired batteries, they will quickly deteriorate or leak, damaging the multimeter.
Overuse: If the multimeter is used for a long time or repeatedly, the battery life will naturally decrease.
Internal short circuit or fault: If there is a problem in the multimeter's circuit, such as a short circuit or fuse problem, the battery will be stressed and will drain quickly.
Temperature effects: The battery can also deteriorate quickly in extremely hot or cold environments.
If proper precautions are not taken while changing the battery, there is a risk of damaging the device. So learning this task means knowing how to protect the device in the right way and safely. Finally, it can be said that as important as a digital multimeter is, learning how to repair or replace its battery is equally important. On the one hand, it makes us efficient and on the other hand, it makes life easy and technology-based. So every multimeter user should learn this task and use it when necessary. So I changed this battery by following certain electronics rules.

X share : https://x.com/maxpro1412/status/1921025324189372510?t=gF4uP803QrwNLfum2kMvvA&s=19
ফাঅাকইংইওর valuable support 👈