SLC-Home Repair Club | S23W5 | Fan Repair: Replacing a Damaged Battery and Restoring Functionality
Assalamualaikum Everyone. I am @imranhassan
From #Bangladesh
.png)
Problem Cause Analysis
A few days ago, a portable fan stopped working. The customer reported that it was not charging and no air was coming out when it was turned on.
When I opened the fan and checked it, I found that the battery was damaged. The customer told me that he had an old damaged mobile phone battery. I checked it to see if it could be suitable for the fan.
Solution Process
First, I removed the old battery from the fan. Then, I tested the old mobile phone battery with a multimeter. It can be seen that it can still work. Next, connect the new battery to the fan circuit and check the
connections thoroughly.
After connecting everything properly, run the fan and test it. Then, it is seen that the fan is working properly and is blowing air.
Conclusion
It has been possible to revive a broken fan with an old mobile battery. This experience shows that sometimes some parts of an old or broken device can be used in another device. I hope this experience will be useful to many, especially those who do minor electronics repairs.
I am going to start my tutorial post.
Step -01
 |  |
|---|
First, I took the broken portable fan in my hand and tested it. It was not working at all. I turned the switch on and off and also turned the fan regulator on and off, but still it did not work.
Step -02
 |  |
|---|
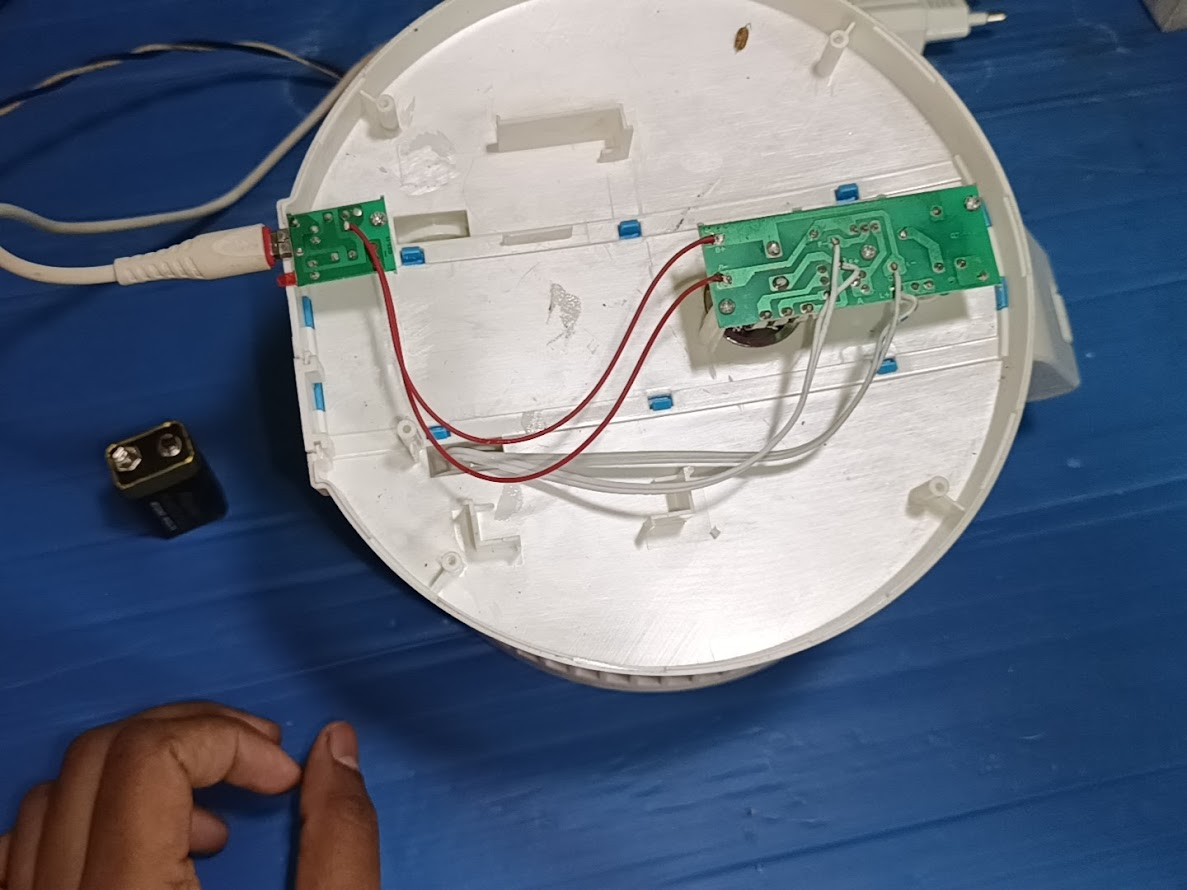
Next, I removed the back part of the fan. As you can see, after opening the back part, the battery and circuit part came out. After that, I took the battery in my hand and observed it for a while.
Step -03
 |  |
|---|
Next, I disconnected the battery line and charging line from the main controlling circuit, so that I could check the output voltage.
Step -04
 |  |
|---|
Then, first I took a 5 volt mobile charger to check the output voltage of the charging circuit of the portable fan. Then, I connected it to the charging section and as you can see, the output voltage is showing 6.40V, which indicates that the charging circuit is fine.
Step -05
 |  |
|---|
Then I checked the output voltage of the battery, where it was showing a very low voltage and was gradually decreasing. The output voltage of the battery was only 1.54V, which indicates that the battery is not working properly. Normally, the output voltage of a 3.7V lithium-ion battery should be 4.2V to 4.7V. Then, I soldered the two wires (positive and negative) of the charging section to the circuit properly.
Step -06
 |  |
|---|
After soldering the two positive and negative wires of the charging section to the controlling circuit properly, I tried running the fan without the battery. It turned out that both the fan and the light were working properly. This clearly proves that the problem is due to the battery and it is 100% certain that the battery is faulty.
Step -07
 |  |
|---|
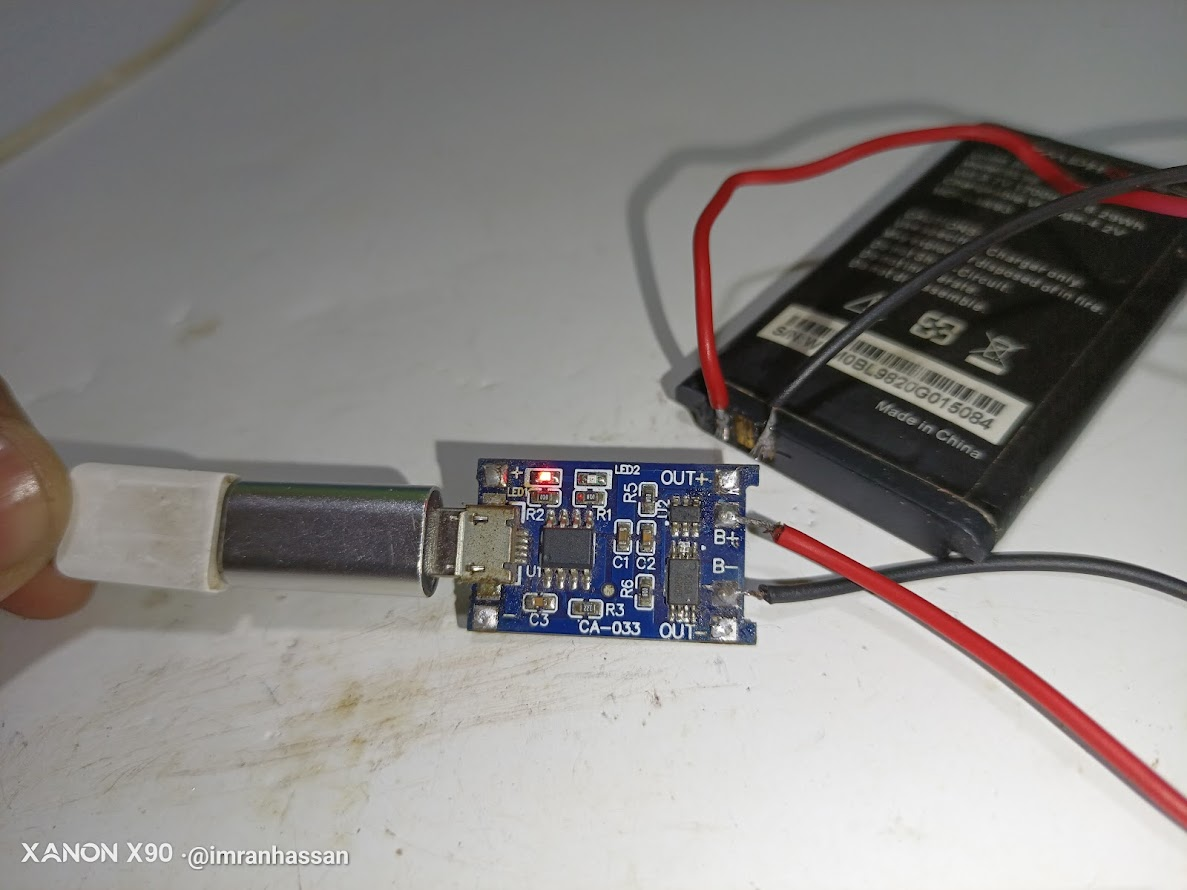
Then I spoke to the owner of the fan, and he told me that he has a faulty mobile battery. He gave me the battery, and I first cleaned the dirt from the junction of the positive and negative output voltage, so that the soldering can be done properly. Then I prepared the battery to connect properly.
Step -08
 |  |
|---|
Then to test the battery, I used a 3.7 volt charging circuit. This is an autocut charging circuit, which is easily available at low cost. Then I connected the charging circuit to the battery, so that it can accept the charge properly and make sure that it works.
Step -09
 |  |
|---|
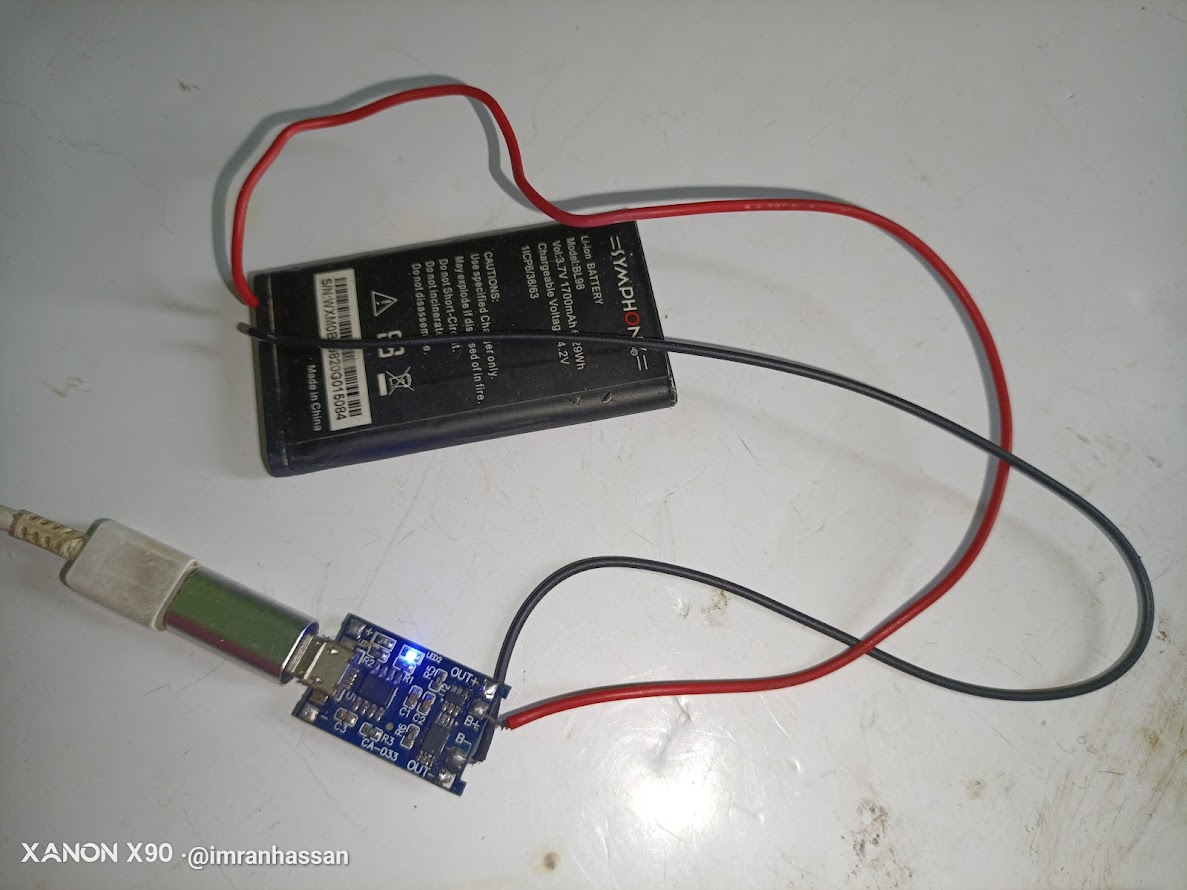
Then I took a 5 volt mobile charger and connected it to the charging circuit. You can see, the red light is on in the circuit, which indicates that the battery is charging. When the battery is fully charged, the blue light will show here. Then I will put the battery inside the fan and test the fan.
Step -10
 |  |
|---|
After charging for two hours straight, you can see that the blue light is on here, which indicates that the battery is fully charged. Then I checked the output of the battery with a multimeter. As you can see, it is giving a very nice output, which is the correct rating of 4.5 volts.
Step -11
 |  |
|---|
Then I soldered the battery to the positive and negative sites of the battery input section of the controlling circuit of the portable fan. As you can see, my fan turned on immediately, because the switch was in the on position before.
Step -12
 |  |
|---|
Then there was a nice LED light in the middle of the portable fan, I checked that too. It was giving off a very nice light, which beautifully highlighted the power capacity of the battery. Then I used a glue gun to glue the battery inside the fan nicely.
Step -13
 |  |
|---|
Then you can see, I set the battery very nicely and it looks pretty good. Then I screwed the bottom cover of the fan. Then I tested the fan by charging it, and it was charging successfully. Everything is working perfectly.
Step -14
 |  |
|---|
Then I took a picture with my club name and my username to verify the authenticity of my tutorial work. Then I took a selfie with the artwork I created, which beautifully showcased my hard work and skill. 😊📸
Portable Fan - Technical Specifications & Troubleshooting
Technical Specifications
| Specification | Details |
|---|---|
| Product | Portable Fan |
| Brand | LR 2018 |
| Model | USB Rechargeable Folding Fan |
| Battery | 4V 1600mAh (Rechargeable) |
| Charging | 5V USB (Charge time: 5-6 hrs) |
| Usage Duration | High Speed: 2-2.5 hrs Low Speed: 2.5-3 hrs Strong Light: 6-8 hrs |
| Diameter | 18 cm |
| Unfold Height | 45 cm |
| Folding Height | 15 cm |
| Power Output | 5V / 0.6A |
Problem & Solution
Problem Description
- Issue: Fan not turning on even after switching ON/OFF.
- Diagnosis:
- Checked battery output, found very low voltage (1.54V instead of 3.7V+).
- Verified charging circuit, found working properly (Output: 6.40V).
- Confirmed battery failure by running the fan directly through the charging circuit.
Solution Steps
Battery Replacement:
- Took a working 3.7V lithium-ion battery from an old mobile phone.
- Cleaned battery terminals and connected a new battery.
Testing & Installation:
- Charged the new battery using a 3.7V charging circuit until fully charged (Blue LED indicator).
- Verified battery output (4.5V after full charge).
- Soldered the battery to the control circuit and tested the fan.
Final Testing:
- Fan and LED light worked perfectly.
- Used glue gun to secure the battery inside the fan.
- Reassembled the fan and verified charging functionality.
✅ Result: Portable fan restored to full working condition.
| Video Tutorial: To better understand the practical part of this tutorial, you can watch the video below. |
|---|
| 📢 These courses and challenges will run from today until 11.59pm UTC, on Sunday, March 23rd, 2025. |
|---|
Here are our selection criteria for the Home Repair Club; if you want, you can read the post and understand it: Clubes de Aprendizaje de Steemit Temporada 23 | Introducción y Bienvenida al Home Repair Club
I invite you to join the Home Repair Club. @sheikhtuhin @max-pro @sushanta83 @mdpolasmia @pepo84 @victornavarro Best wishes to you all.
Photography Details: 📱DeviceWalton Xanon x90
Best regards
@imranhassan
My friend @rmm31

Saludos amigo @imranhassan hizo un muy buen tutorial con el detallado paso a paso para reparar el ventilador. El uso de la batería le ha devuelto la vida útil al ventilador, realizó un procedimiento con resultados satisfactorios. Felicidades. Gracias por compartir con nosotros este tutorial. Éxitos y que Dios le bendiga
Greetings, friend. Thank you very much for your valuable comment. I am glad that the step by step guide to repairing a fan was helpful to you. Restoring the functionality of a ventilator using a battery is a really effective method. I always try to provide all the information in one post. Sometimes I like my own posts a lot and I read my own posts two to three times. Thank you for your support. God bless you and I wish you a lot of success too.
Si amigo,está muy bueno el tutorial. Dios le bendiga
I promoted my post X here.
We are grateful for sharing your valuable posts in the Steem4Entrepreneurs community. We are always interested in seeing posts related to your economic business activities. Stay connected with our community by posting regularly. The review details for your post are below.
Support the development of the Steem4Entrepreneurs community by delegating your sp.
Saludos amigo.
Gracias por la invitación, excelente tutorial, muy interesante, excelente paso a paso.
Suerte y bendiciones de DIOS