SC27🚌W2 ✈️ OpenTTD - R🚌O🚛A🚚D🚐S

I believe all of you have learned the first OpenTTD lesson well. You can either continue the previous task or join as new participants.
In the previous lesson, we created a map (a world) and chose two towns for development.
And today’s topic is road transport.
As you have already seen, there are towns on the map — they live their own lives. All of them are growing. But cities grow faster.
A city is a town that has (City) written in parentheses next to its name.
If you build a road, the town will expand along that road — though not always (it’s not 100% guaranteed).
Other towns build their own roads for growth.
✨ROAD✨

 |  |
| I have two towns: Dnipro(835) Sergeyk(348) | I will connect them with a road. |
To do this, I select the Road button in the toolbar.


You can choose the first or the second button to build a road in a specific direction, or the third button to build roads in any direction.
Note that it matters where exactly you click within a tile — roads will automatically turn and connect.
The eleventh button (or the second one from the right), with a bulldozer icon, lets you remove a road.
⚠️ A road has an owner — you cannot remove someone else’s road.
⚠️ Each road tile requires not only a one-time construction cost but also maintenance expenses.
So, if you build too many roads, you can quickly go bankrupt.
These expenses are shown in the Infrastructure section of the financial report window.
✨Depot✨
The fifth button is the Depot (after the dynamite), which allows you to remove “extra” items from the map.
Such removal is usually costly — after the action, the amount appears in red, and sometimes in green, giving a small profit.
So, let’s select the fifth button and place a depot.
A depot has an orientation (its exit can face any of the four directions), so choose the orientation according to your road.

✨Stations. Buses✨
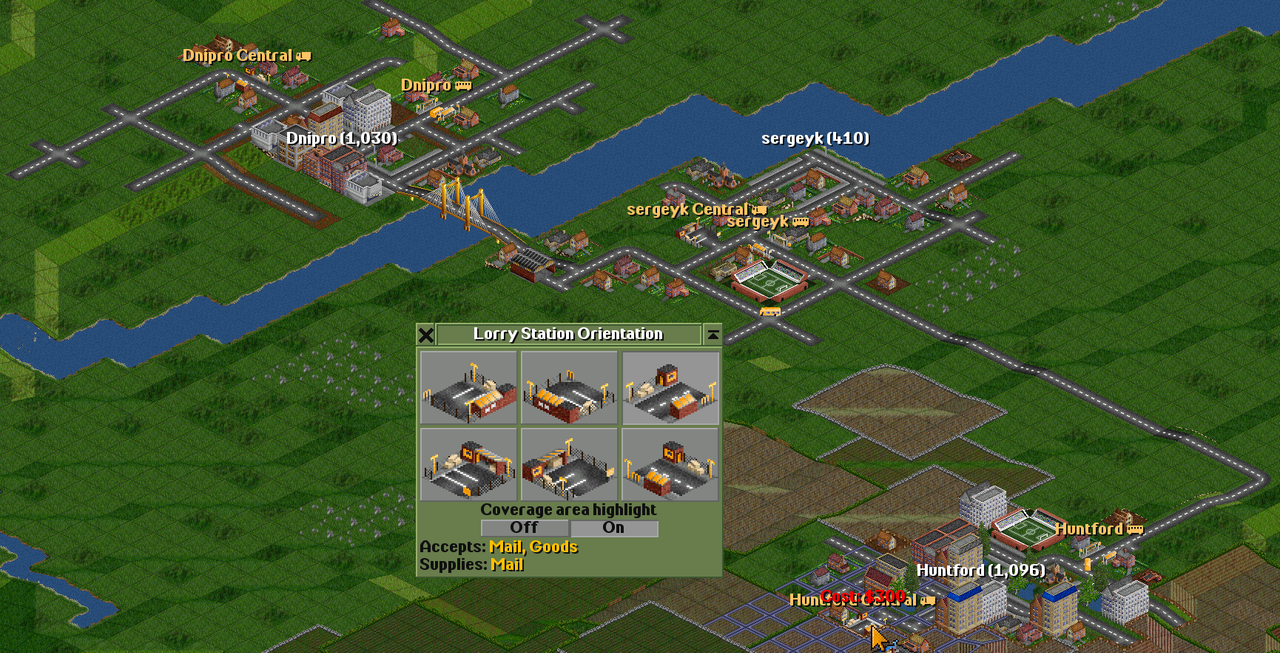
The next, sixth button is for bus stations. There are six of them — the four on the left are stations with different orientations, which should be connected to a road within a tile, and the two on the right can be placed directly on a road.
A station shows its coverage area — a purple grid — and indicates which resources it can receive or send.
Stations should be built first. If you drastically alter the terrain with the bulldozer, removing trees or buildings, the town will not allow you to place a station.
You can fix this by planting many trees near the town, but this does not always work and is slower than you might like.
So, build stations first.
 |  |
Here, I built a station in one town and in the other, trying to cover as many buildings as possible.
Let’s go back to the depot.
Clicking on the depot opens its window. Then you should press New Vehicle, which will show a list of available transport — this list changes over time. Some vehicles become obsolete, and new ones appear.
Since we started the game in 1950, there is only one bus for now — the MPS Regal Bus. Other buses that will be invented over the years will have higher speed, capacity, and so on.
Pressing the Buy Vehicle button or double-clicking on a bus buys the bus.
 |  |
| I buy the first one | I have already bought two buses |
Next, I click on the first bus in the depot, and in the window that appears, I press the orange arrow — the task window will open.
The Go To button will be pressed automatically. Then you should select one station and then the other.
This way, we have assigned a task to the first bus. But it is still standing in the depot.
Click the red cross in front of the bus number to send it according to its tasks, or press Stopped at the bottom of the bus window.
For the second bus, you can create a task list in the same way.
Alternatively, after pressing the orange arrow, you can select another bus — all tasks will be copied to it.
However, changing the tasks of one bus will not affect the tasks of the other. The tasks are not shared; they are only copied at the moment of creation.
If you want the same single task for multiple buses, you should copy the tasks while holding CTRL.
 |  |
 |  |
✨Stations. Trucks✨
Now let’s make stations for different types of cargo. There are two types of stations here — for passengers and for other cargo.
For this, the next button in the toolbar, the seventh one, is used — it’s located before the white arrow on a blue background (for one-way traffic).
 |  |
I choose a location and place the station,

similarly in the other town.
I click on the same depot and select a truck for mail from the list — each type of cargo has its own truck, so take note.

I set the schedule in the same way: select the truck, press the yellow task arrow, choose one station, then the other, and click the red cross to dispatch it.
 |  |  |
If there are too many windows on the screen, you can close them all at once with the Del key.
To keep some important windows open, pin them using the pin button in the top-right corner, where the X to close the window is normally located.
Clicking on a station will show how many passengers or other resources it has.

If there are many stations, the eighth button on the main toolbar helps you manage them.

✨Finances✨
Since this is an economic game, profit plays the main role here.
If you’ve been playing for a while, you’ve probably noticed the yearly financial report that pops up.

For example, here you can see that my current loan is 200,000 at 4% interest per year.
The maximum loan I can take is 600,000.
The window also shows expenses for purchasing and maintaining vehicles and infrastructure.

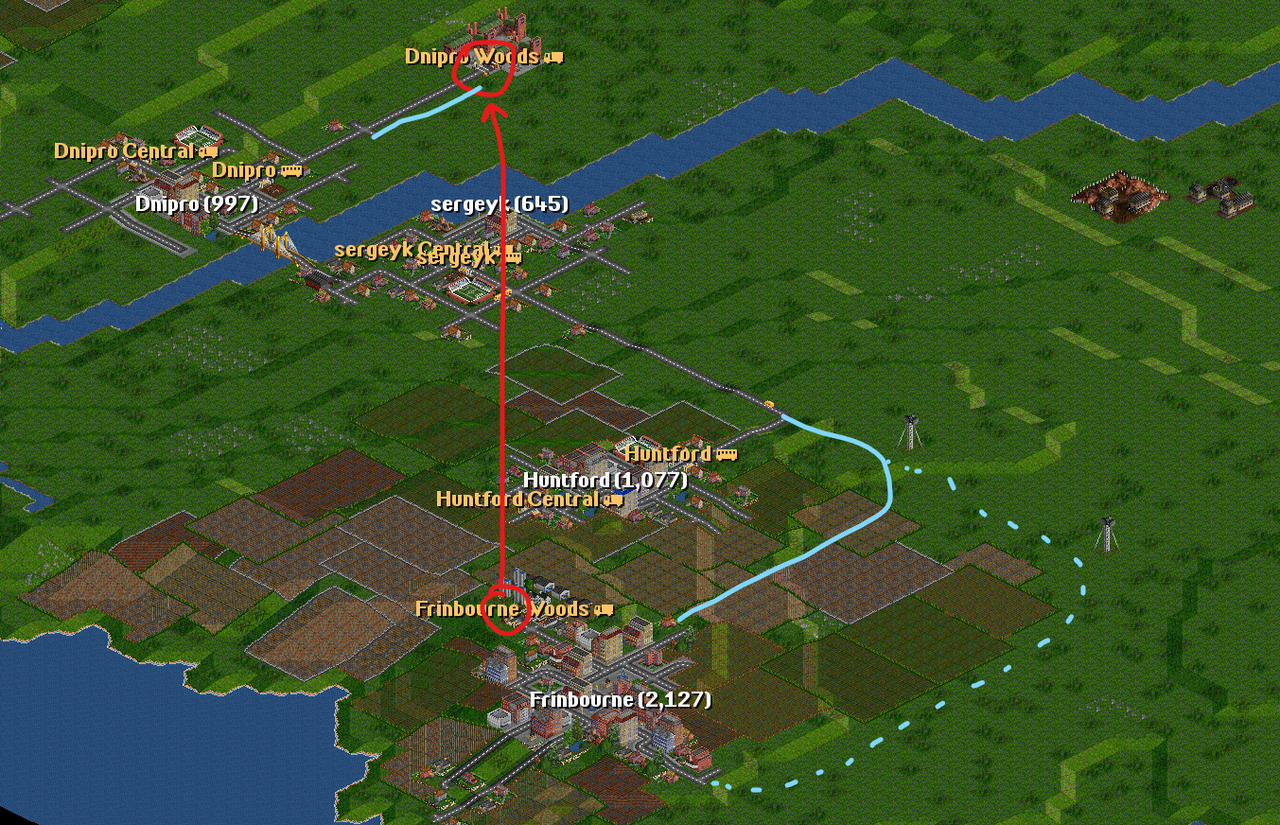
In short, by building roads, you can influence the direction in which a town grows — buildings appear along roads.
The town builds its own roads, but you can “help” it by laying roads in the direction you want it to expand.

Here, I built roads in the direction I wanted my town to develop.

I also found another town nearby — Huntford, with 1,046 inhabitants.
I built a bus station there, bought a new bus, and connected the two towns with a route.
On the outskirts of Huntford, I plan to build a post station, but I won’t buy a new vehicle.
Instead, I’ll catch one of my existing trucks and add this new station to its route.
So don’t buy too many vehicles — if a bus carries only two or three passengers, it won’t be profitable.
The maintenance costs of the bus will exceed its income or reduce it significantly.
When building a station, make sure it both accepts and supplies the appropriate resources.
Here I’ve caught a truck, clicked on it with the mouse, and now I’ll press the orange arrow to open the Orders window.


In the Orders list, I first clicked on --End of orders--, then pressed the Go To button and selected the station to which I wanted to extend the route.
The eighth button on the toolbar — Stations — should be checked from time to time to monitor how full the stations are.
For overfilled stations, send additional vehicles.

✨ Production Chains
Production chains vary across different biomes. That’s why I’ll demonstrate them using the simplest biome as an example.
The easiest and most accessible option at the beginning is transporting passengers and mail, which are available in towns.
Between the Company League Table button and the Trains button, there’s the Industries button — I click it and select Production Chains.

Over the years, I’ve learned most of these production chains almost by heart — but I still check them sometimes, especially in other biomes.

Now I clicked “Link to minimap”, and as soon as I select a cargo type, the minimap shows both the places where this cargo is produced and where it is delivered.
In the example, I selected Steel — so on the minimap, only the industries that produce and accept steel are displayed.
But note that you can’t transport steel right away, because it’s not a primary resource — it’s a processed one.
To produce steel, you first need to deliver iron ore to the steel mill.
So, there’s a chain with one link:
Passengers → Passengers,
and the one I’ve just described is a two-link chain:
Iron Ore (from Iron Ore Mine) → Steel Mill → Steel (from Steel Mill) → Factory.

I’ll buy another truck for transporting grain.
I’m building a station at the Farm in the lower part of the image — it’s almost inside the town.

At the top of the image, I’m building a station at the Factory and connecting it to the existing road.
To connect the lower station to the road, I’d have to build the road across the field (shown as a solid blue line) — that’s very expensive, and it will also reduce the farm’s production of grain.
However, I can build the road around the field, which is cheaper and keeps the field intact, though it makes the delivery route longer.

As you can see, for Truck №8, I set its order to full load at the farm.
For the other trucks, I won’t create new orders manually. Instead, I’ll assign them the same route as Truck №8.

In the window for Truck №5, I click the yellow orders arrow and simply select Truck №8 — this copies all of Truck №8’s orders to Truck №5. I’ll do the same for the other two trucks.

See how much grain has accumulated at the station? Now I’ll buy a few more trucks — but this time, by cloning.

Four trucks have just arrived at the factory to unload, yet there are already 212 tons of grain waiting at the farm. I have a feeling that two more trucks won’t be enough — so I’ll buy three.

In the depot, I clicked Clone Vehicle — two small trucks appeared next to the cursor, showing that cloning mode is active. I clicked on one of the existing trucks three times and got three copies.
So now, seven trucks are running between the farm and the factory.

However, this farm can also produce livestock, sometimes even more than grain. There’s none now because no livestock truck has arrived yet.
So I’ll go to the depot and buy a livestock truck.
First, I’ll buy one, give it the same orders as the grain trucks (copy the orders, not the truck itself), and then I’ll clone it four more times — the copies will already have the same route assigned.

I bought a livestock truck and set its route.
Now I’m cloning four more of them.

As you can see, I now have five livestock trucks in the depot.
I can release them one by one by clicking the red cross next to each vehicle — or send all of them at once by clicking the green circle.


I waited until all the trucks (that’s 7 grain + 5 livestock) left the farm — and now the farm has accumulated 343 heads of livestock and 53 tons of grain.
So... how many more trucks do I actually need?
But now I have different types of trucks on the road — so how do I tell which is which?
I want to clone three more grain trucks, but where are they?
Under the orange arrow there’s a white sheet icon labeled Details — there you can see exactly what each truck is carrying.

In the toolbar, right after the trophy and trains, there’s a button for all road vehicles. It shows how much profit each vehicle has made this year and last year.
The red numbers mean losses — that’s normal, because those vehicles were just bought.
I also opened the Stations window — it shows that there’s a lot of livestock waiting at the farm.

Homework
In the tasks, I included images and tables — you should recreate them at certain points while completing the assignment.
🚛Task 0🚚
You don’t need to complete or report on this task 0 — just check if everything is correct on your side.
Download the file homework1 that you saved in Task 3 of the previous lesson, when you selected two towns.
After that, you worked on very costly landscaping, which heavily spent your funds.
Your account should have 200,000 USD or slightly less — the exact amount isn’t very important.

Or start from scratch, but create a world with the same settings as last time. You can even choose a different biome (1, 2, or 3).
On the other hand, these biomes are kind of a difficulty level — biomes 1 and 2 are just different, but playing in a desert is harder.
So, you either use the game from the previous lesson or a newly created one.
The important points are:
- Two towns, as in Lesson 1, Task 3.
- 200,000 USD or slightly less, since years have passed and taxes/interest were paid.
🚛Task 1🚚 - 3 point
So now you already have a map (either new or from the previous lesson).
You have two selected and renamed towns.
You have about 200,000 in credit (the maximum loan is 600,000).
(pic) Show the starting year (1), initial funds (2), and the population of the two selected towns (3, 4) at the beginning of this homework, and also show them at the end of your work.
(pic) Build a bus station in your town (the one with your login) and in the second town (the capital).
Build a depot.
Lay a road between the towns.
(pic) Demonstrate that building a road on different tiles has different costs (use + shift).
(pic) Buy one bus.
(pic) Assign it an order — a route between these stops (the two towns).
Similarly, build cargo stations in both towns.
Buy a mail truck in the depot.
Send it to carry mail between the stations.
It’s recommended to illustrate all key actions with screenshots, and here’s a hint: wherever you see (pic), a screenshot is mandatory.
🚛Task 2🚚 - 3 point
(pic) Independently choose another type of resource and the corresponding industry for it.
Choose simple resources — those that are already on the map (resources with only one link in the production chain).
For example: Coal → Power Plant, Wood → Sawmill, Ore → Steel.Extend the road and build a depot if necessary.
Buy a truck for the corresponding type of cargo.
(pic) Set up a route (order) to transport this type of cargo.
🚛Task 3🚚 - 3 point
Describe what you think about your transport company — what is missing?
Probably more vehicles.
Buy as many vehicles as you like. If the town is large, you can transport passengers or mail from one end of the town to the other. It’s not necessary to transport between towns.
If the town is large, everything can be handled within it.
However, do not transport other resources — stick to the one you chose, e.g., ore, coal, or wood.
Over 11 years, I repaid 200,000 in credit. The financial window shows that the maximum loan is 600,000. You may take an additional loan if needed.
(pic) But make sure to capture the moment when you have fully repaid the credit.
 |  |
| HW Start | HW End |
| HW Start | HW End | |
| Year | 1950 | 1966 |
| Dnipro | 835 | 1807 |
| sergeyk | 348 | 1197 |
| USD | 196K (-200К) | 22K |

This is my company’s window at the end of the HW.
 |  |
Please show all your transport at the end of the game.
🚛Task 4🚚 - 1 point
Earn another 200,000 — how many years have passed?
For example, here I did nothing — didn’t buy or build anything.
I just pressed TAB, which speeds up time,
and these 200,000 simply arrived.

| Year | 1950 | 1966 | 1968 |
| Dnipro | 835 | 1807 | 1669 |
| sergeyk | 348 | 1197 | 1268 |
| USD | 196K | 22K | 201К |
Save the game as HomeWork2 — next time, you will continue from this point.
You will have your own 200,000 (approximately 197K–203K), while new players will have 200,000 in credit.
✨Rules for Participation
🚌 Title of your work: SLC S27 Week2 - Let's Play OpenTTD:Roads
🚌 You can publish your work in any language, in any community, or simply in your own blog. Add the link to your work below as a comment.
🚌 To help me quickly find, review, and evaluate your work, leave the link in the comment under this text, and in your work, use the tag #openttd-w2, your country tag, and your club status tag
🚌 Plagiarism and the use of AI are prohibited.
🚌 Participants must be verified and active users of the platform.
🚌All images used must belong to the author or be free of copyright. (Don’t forget to credit the source.)
🚌 Participants must not use any bot services for voting or engage in vote buying.
🚌 Recommend your 4 friends to participate.
🚌 Submission Period: From Monday (6 Oct Sep 2025), to Sunday (12 Oct 2025).
🚌 Promote on social networks like X.
Rewards:
✈️ SC01/SC02 will evaluate posts across all participating teaching teams. Upvotes are not guaranteed for all articles.
✈️ Your work will be reviewed, commented on, and evaluated by me. Six best works will be selected. Participants who won last week will have a lower chance of being selected again, while those who did not win previously will have a higher chance if their work is well executed.
Good luck 🍀 on your task!
3121 words, 13 min read